Update to Ubuntu 11.10 Oneiric Ocelot

These days, Ubuntu's new release hit the repositories, so I upgraded my three systems as soon as possible to see if some annoying Unity bugs have been solved finally. Here is the resume and the reasons why I'll evaluate to switch to KDE finally: Upgrade
During the upgrades I had two issues:
  1. Emacs got somehow broken on one system y prevented the upgrade process to finish completely. It even said, the process had been aborted, but the only thing missing was the last Cleanup step.
    I removed emacs packages and reinstalled them, then everything went fine.
  2. Screenblanker got stuck on one of my machines during upgrade, so I could hit on any button to enter the last Cleanup step.
    I connected via Remote Desktop to that machine and could finish the process correctly.
Updating custom repositories
As usual, the upgrade process disables all your custom repositories to prevent problems. You'll have to adapt and enabled them by hand, or you might use these instructions to do this with a few commands.
# Become super-user
sudo -i

# Set some variables (these can be changed to adapt to other Ubuntu versions)
export old=natty
export new=oneiric

# Enter repository list folder
cd /etc/apt/sources.list.d/

# Change old distribution list files and store them as newer ones
for sl in *-${old}.list ; do echo "Creating ${sl/${old}/${new}}" ; sed 's/\(.*\) '${old}'\(.*\)/\1 '${new}'\2/' $sl > ${sl/${old}/${new}} ; done

# Enable and remove the "disabled ..." comment
for sl in *-${new}.list ; do echo "Enabling ${sl}..." ; sed -i.bak 's/^# \(.*\) disabled on upgrade to '${new}'$/\1/' $sl ; done

# Check they are all fine
for sl in *-${new}.list ; do echo "Content of ${sl/${old}/${new}}:" ; cat $sl ; done

# Cleanup backup files and old distribution list files (not needed any longer)
rm *-${old}* *${new}.list.bak

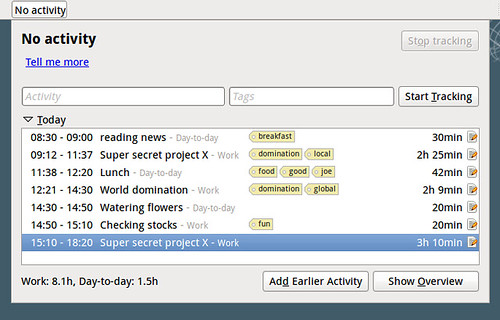
Time tracking with Hamster indicator

At work, I find it very handy to track the time I'm spending on some tasks. Especially, if you have to report to someone the time you spend on certain projects or whatever.
Hamster is such a time tracker that I found to be very useful, easy to use, and enables you to obtain statistics about your daily/weekly/yearly work.

It gives you the possibility to introduce information from the shell, but there's also a graphical indicator available, which fits perfectly with Ubuntu Gnome and Unity.

Install instructions

If you need more details about the following installation and configuration commands, you can consult this article.
# Add repository
sudo add-apt-repository ppa:albertomilone/hamster-indicator

# Add description to repository for easier identification
sudo sed -i.save 's/$/ #Hamster-Indicator Time-Tracker/' /etc/apt/sources.list.d/albertomilone-hamster-indicator-natty.list

# Install Hamster Indicator
sudo apt-get update
sudo apt-get install hamster-indicator

Configuration

The hamster indicator permits to change how and which information to show on the Unity panel.
# Show all possible configuration values and values
gconftool-2 -R "/apps/hamster-indicator"

# Toggle Icon Glow
gconftool-2 --toggle "/apps/hamster-indicator/icon_glow"

# Toggle Show Label
gconftool-2 --toggle "/apps/hamster-indicator/show_label"

# Set enough space for label
gconftool-2 --set "/apps/hamster-indicator/label_length" --type int "20"

Database location

It might be interesting to now, where Hamster stores it's data, for example for backups, or if you want to copy/share the data to another Ubuntu installation.
~/.local/share/hamster-applet/hamster.db

Obtain some basic hardware details of your Ubuntu system

Unix systems are capable of recognizing lots of details of your hardware, so instead of having to open your PC for obtaining information like serial numbers, just use some shell commands.
Here is a list of such useful commands.

General system

grep -r . /sys/class/dmi/id/ 2>/dev/null
lsusb
lspcmcia
lspci -vvnn
udevadm info --export-db
lshal
sudo lshw

BIOS

sudo vpddecode    # Serials from BIOS, Motherboard
sudo biosdecode   # More details about BIOS
sudo dmidecode -q # Show information about valid BIOS components
sudo dmidecode    # Show also unknown/invalid BIOS components

CPU

lscpu
cat /proc/cpuinfo

Audio

cat /proc/asound/card*/codec#*

Drivers

lsmod

Upgrade to Picasa 3.8 on Ubuntu


If you're still stick to old 3.0 version of Picasa on your Ubuntu system (because you prefer it over Ubuntu's own programs, as I do), here are some instructions about how to upgrade Picasa to newer versions which have for example Face Recognition.

Install instructions

These instructions have been tested on Ubuntu Natty, and for Picasa 3.8, in case there's a newer version released you'll have to change it's location (search below for HERE).
## Add Google's testing repository for Picasa
sudo echo "deb http://dl.google.com/linux/deb/ testing non-free #Google Picasa" > /etc/apt/sources.list.d/google-unstable.list
sudo apt-key adv --keyserver keyserver.ubuntu.com --recv-keys 7FAC5991
sudo apt-get update
## Install Picasa 3.0
sudo apt-get install picasa

## Download Picasa 3.8 installer
# If there's a newer version you might to have to change it's name and location HERE
cd /tmp && wget http://dl.google.com/picasa/picasa38-setup.exe

## Install it (will not override your current Linux Picasa 3.0)
# Use default settings
wine /tmp/picasa38-setup.exe

## Copy over Picasa 3.8 files to your Linux Picasa 3.0 installation with backup
sudo cp -r /opt/google/picasa/3.0/wine/drive_c/Program\ Files/Google/Picasa3{,_3.0}
sudo cp -r ~/.wine/drive_c/Program\ Files/Google/Picasa3/* /opt/google/picasa/3.0/wine/drive_c/Program\ Files/Google/Picasa3/

## Uninstall the previous installed Picasa 3.8 (it's not needed any longer)
wine ~/.wine/drive_c/Program\ Files/Google/Picasa3/Uninstall.exe
Now you can run Picasa as usual from Applications --> Graphics --> Picasa --> Picasa
In case that something went wrong, you can find a backup of Picasa 3.0 in /opt/google/picasa/3.0/wine/drive_c/Program\ Files/Google/Picasa3_3.0