Obtain some basic hardware details of your Ubuntu system

Unix systems are capable of recognizing lots of details of your hardware, so instead of having to open your PC for obtaining information like serial numbers, just use some shell commands.
Here is a list of such useful commands.

General system

grep -r . /sys/class/dmi/id/ 2>/dev/null
lsusb
lspcmcia
lspci -vvnn
udevadm info --export-db
lshal
sudo lshw

BIOS

sudo vpddecode    # Serials from BIOS, Motherboard
sudo biosdecode   # More details about BIOS
sudo dmidecode -q # Show information about valid BIOS components
sudo dmidecode    # Show also unknown/invalid BIOS components

CPU

lscpu
cat /proc/cpuinfo

Audio

cat /proc/asound/card*/codec#*

Drivers

lsmod

Upgrade to Picasa 3.8 on Ubuntu


If you're still stick to old 3.0 version of Picasa on your Ubuntu system (because you prefer it over Ubuntu's own programs, as I do), here are some instructions about how to upgrade Picasa to newer versions which have for example Face Recognition.

Install instructions

These instructions have been tested on Ubuntu Natty, and for Picasa 3.8, in case there's a newer version released you'll have to change it's location (search below for HERE).
## Add Google's testing repository for Picasa
sudo echo "deb http://dl.google.com/linux/deb/ testing non-free #Google Picasa" > /etc/apt/sources.list.d/google-unstable.list
sudo apt-key adv --keyserver keyserver.ubuntu.com --recv-keys 7FAC5991
sudo apt-get update
## Install Picasa 3.0
sudo apt-get install picasa

## Download Picasa 3.8 installer
# If there's a newer version you might to have to change it's name and location HERE
cd /tmp && wget http://dl.google.com/picasa/picasa38-setup.exe

## Install it (will not override your current Linux Picasa 3.0)
# Use default settings
wine /tmp/picasa38-setup.exe

## Copy over Picasa 3.8 files to your Linux Picasa 3.0 installation with backup
sudo cp -r /opt/google/picasa/3.0/wine/drive_c/Program\ Files/Google/Picasa3{,_3.0}
sudo cp -r ~/.wine/drive_c/Program\ Files/Google/Picasa3/* /opt/google/picasa/3.0/wine/drive_c/Program\ Files/Google/Picasa3/

## Uninstall the previous installed Picasa 3.8 (it's not needed any longer)
wine ~/.wine/drive_c/Program\ Files/Google/Picasa3/Uninstall.exe
Now you can run Picasa as usual from Applications --> Graphics --> Picasa --> Picasa
In case that something went wrong, you can find a backup of Picasa 3.0 in /opt/google/picasa/3.0/wine/drive_c/Program\ Files/Google/Picasa3_3.0

Reading Skype logs


If you use Skype a lot, for example at work, it will accumulate hundreds of chat database files .dbb on your system.
Information in these history files is partially compressed, so searching something particular in these files is only possible from Skype itself and its searching engine isn't very useful.

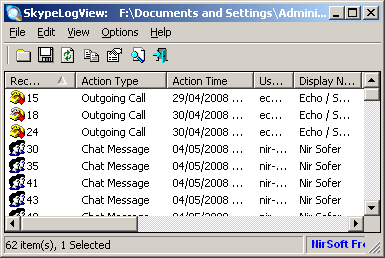
Better you use the Skype Logs Reader/Viewer, which is able to read these files and permits to search for text, export all text into several text or HTML formats, so you can use more powerful tools like your web browser, grep, word processor, spreadsheet, etc. to look for the information you remember vaguely you interchanged months or years ago.

Install instructions

This program doesn't need any installation, just unzip the archive anywhere you want.
It is designed for Windows, but runs fine with wine on your Ubuntu system.

Usage on Linux

As mentioned before, you need wine to run this program on Linux.
  • Just execute it with wine SkypeLogView.exe
  • In the dialog for locating Skype's database files, you'll have to enter
    h:\.Skype\yourusername
  • If you're not sure about which unit is mapped to your home folder you could obtain it from with winepath -w ~/.Skype

Manager for installing applications from PPA repositories

Search results for Chromium package.
I just discovered an application I was hoping for: Y PPA Manager.

Find easily the corresponding repository for a specific application, remove added PPA-repositories, etc., with this simple desktop tool.

Install instructions

The following command lines will install the tool, and I almost promise; this is the last time you add a repository from the command line.
# Add repository
sudo add-apt-repository ppa:webupd8team/y-ppa-manager

# Add description to repository for easier identification
sudo sed -i.bak 's/$/ #Y-PPA-Manager/' /etc/apt/sources.list.d/webupd8team-y-ppa-manager-natty.list

# Install
sudo apt-get update
sudo apt-get install y-ppa-manager

Features

  • For example, search for Chromium and it will offer you more than 20 repositories, from daily, beta, official ones.
  • It advises, if there isn't a repository for your current distro, for example, Ailurus still isn't available for Natty.
  • You can browse all packages offered by a repository before enabling it for your system.
  • Somehow, I often run into problems with PPA keys, maybe because I just copy the corresponding PPA entries from /etc/apt/sources.list.d to another machine.
    Each time I run the apt-get update command, I get lots of warnings about missing GPG keys.
    Y-PPA-Manager offers a command to clean up all these errors by automatically importing all missing keys.
  • The PPA-purge option disables a PPA from your Software Sources and reverts your system to normal after testing a new version from a PPA.
In short words: A-must-have-tool for Ubuntu.

Command line

You can also use Y-PPA-Manager commands directly from the shell (in case you still miss the terminal), just execute this to see all available commands:
y-ppa-cmd
launchpad-getkeys  # import all missing keys
ppa-purge              # remove a PPA repository source from your system

Convert existing PPA repositories to Natty

I'll offer you here some commands you might want to use to convert your existing PPA repositories to your upgraded distro.
When upgrading Ubuntu to a newer version, all your personal repositories will be disabled to prevent problems.
After the upgrade you'll have to enable them by hand, even worse, the ones you had disabled before upgrading still point to the repositories of the previous distro.
You might use some of these commands to make these changes automatically.
# Become super-user
sudo -i
# Enter repository list folder
cd /etc/apt/sources.list.d/
# Change maverick to natty for all maverick specific list files and store them as natty ones
for sl in *-maverick.list ; do echo ${sl/maverick/natty} ; sed 's/# \(.*\) maverick\(.*\)/\1 natty\2/' $sl > ${sl/maverick/natty} ; done
# Remove the "disabled ..." comment
for sl in *-natty.list ; do echo ${sl} ; sed -i.bak 's/ disabled on upgrade to natty$//' $sl ; done
# Check they are all fine
for sl in *-natty.list ; do echo ${sl/maverick/natty} ; cat $sl ; done
# Cleanup backup files and maverick list files (not needed any longer)
rm *-maverick* *.list.bak