Showing posts with label Ubuntu. Show all posts

Changing wallpapers with Wally

Years ago, I posted about tools for changing your desktop wallpaper automatically.
The best tool I found so far is Wally, which is able not only to rotate through your local wallpaper picture collection, but also obtain them from several online storages like Picasa, Flickr, remote folders, etc.
It permits to define tags to include certain sets of pictures that you like.

Install instructions

Wally can be found in the universe repository of your Ubuntu system.
sudo apt-get install wally

KUbuntu

Wally is available as desktop plugin, so you'll have to enable it in your desktop folder settings.

Ubuntu Oneiric

Ubuntu recently changed the management of the desktop wallpaper, which breaks Wally 2.3.2 (the one which can be found in the repository), it isn't able to replace the wallpaper. To repair this, you'll have to install the .deb package 2.4.3 from the developers website.

Update to Ubuntu 11.10 Oneiric Ocelot

These days, Ubuntu's new release hit the repositories, so I upgraded my three systems as soon as possible to see if some annoying Unity bugs have been solved finally. Here is the resume and the reasons why I'll evaluate to switch to KDE finally: Upgrade
During the upgrades I had two issues:
  1. Emacs got somehow broken on one system y prevented the upgrade process to finish completely. It even said, the process had been aborted, but the only thing missing was the last Cleanup step.
    I removed emacs packages and reinstalled them, then everything went fine.
  2. Screenblanker got stuck on one of my machines during upgrade, so I could hit on any button to enter the last Cleanup step.
    I connected via Remote Desktop to that machine and could finish the process correctly.
Updating custom repositories
As usual, the upgrade process disables all your custom repositories to prevent problems. You'll have to adapt and enabled them by hand, or you might use these instructions to do this with a few commands.
# Become super-user
sudo -i

# Set some variables (these can be changed to adapt to other Ubuntu versions)
export old=natty
export new=oneiric

# Enter repository list folder
cd /etc/apt/sources.list.d/

# Change old distribution list files and store them as newer ones
for sl in *-${old}.list ; do echo "Creating ${sl/${old}/${new}}" ; sed 's/\(.*\) '${old}'\(.*\)/\1 '${new}'\2/' $sl > ${sl/${old}/${new}} ; done

# Enable and remove the "disabled ..." comment
for sl in *-${new}.list ; do echo "Enabling ${sl}..." ; sed -i.bak 's/^# \(.*\) disabled on upgrade to '${new}'$/\1/' $sl ; done

# Check they are all fine
for sl in *-${new}.list ; do echo "Content of ${sl/${old}/${new}}:" ; cat $sl ; done

# Cleanup backup files and old distribution list files (not needed any longer)
rm *-${old}* *${new}.list.bak

Time tracking with Hamster indicator

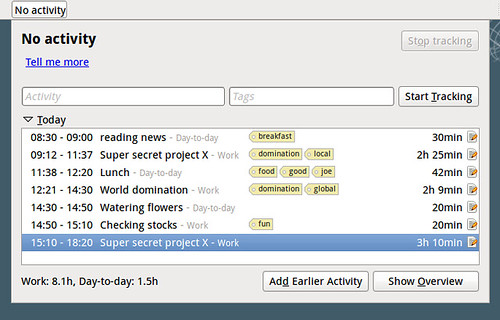
At work, I find it very handy to track the time I'm spending on some tasks. Especially, if you have to report to someone the time you spend on certain projects or whatever.
Hamster is such a time tracker that I found to be very useful, easy to use, and enables you to obtain statistics about your daily/weekly/yearly work.

It gives you the possibility to introduce information from the shell, but there's also a graphical indicator available, which fits perfectly with Ubuntu Gnome and Unity.

Install instructions

If you need more details about the following installation and configuration commands, you can consult this article.
# Add repository
sudo add-apt-repository ppa:albertomilone/hamster-indicator

# Add description to repository for easier identification
sudo sed -i.save 's/$/ #Hamster-Indicator Time-Tracker/' /etc/apt/sources.list.d/albertomilone-hamster-indicator-natty.list

# Install Hamster Indicator
sudo apt-get update
sudo apt-get install hamster-indicator

Configuration

The hamster indicator permits to change how and which information to show on the Unity panel.
# Show all possible configuration values and values
gconftool-2 -R "/apps/hamster-indicator"

# Toggle Icon Glow
gconftool-2 --toggle "/apps/hamster-indicator/icon_glow"

# Toggle Show Label
gconftool-2 --toggle "/apps/hamster-indicator/show_label"

# Set enough space for label
gconftool-2 --set "/apps/hamster-indicator/label_length" --type int "20"

Database location

It might be interesting to now, where Hamster stores it's data, for example for backups, or if you want to copy/share the data to another Ubuntu installation.
~/.local/share/hamster-applet/hamster.db

Obtain some basic hardware details of your Ubuntu system

Unix systems are capable of recognizing lots of details of your hardware, so instead of having to open your PC for obtaining information like serial numbers, just use some shell commands.
Here is a list of such useful commands.

General system

grep -r . /sys/class/dmi/id/ 2>/dev/null
lsusb
lspcmcia
lspci -vvnn
udevadm info --export-db
lshal
sudo lshw

BIOS

sudo vpddecode    # Serials from BIOS, Motherboard
sudo biosdecode   # More details about BIOS
sudo dmidecode -q # Show information about valid BIOS components
sudo dmidecode    # Show also unknown/invalid BIOS components

CPU

lscpu
cat /proc/cpuinfo

Audio

cat /proc/asound/card*/codec#*

Drivers

lsmod

Manager for installing applications from PPA repositories

Search results for Chromium package.
I just discovered an application I was hoping for: Y PPA Manager.

Find easily the corresponding repository for a specific application, remove added PPA-repositories, etc., with this simple desktop tool.

Install instructions

The following command lines will install the tool, and I almost promise; this is the last time you add a repository from the command line.
# Add repository
sudo add-apt-repository ppa:webupd8team/y-ppa-manager

# Add description to repository for easier identification
sudo sed -i.bak 's/$/ #Y-PPA-Manager/' /etc/apt/sources.list.d/webupd8team-y-ppa-manager-natty.list

# Install
sudo apt-get update
sudo apt-get install y-ppa-manager

Features

  • For example, search for Chromium and it will offer you more than 20 repositories, from daily, beta, official ones.
  • It advises, if there isn't a repository for your current distro, for example, Ailurus still isn't available for Natty.
  • You can browse all packages offered by a repository before enabling it for your system.
  • Somehow, I often run into problems with PPA keys, maybe because I just copy the corresponding PPA entries from /etc/apt/sources.list.d to another machine.
    Each time I run the apt-get update command, I get lots of warnings about missing GPG keys.
    Y-PPA-Manager offers a command to clean up all these errors by automatically importing all missing keys.
  • The PPA-purge option disables a PPA from your Software Sources and reverts your system to normal after testing a new version from a PPA.
In short words: A-must-have-tool for Ubuntu.

Command line

You can also use Y-PPA-Manager commands directly from the shell (in case you still miss the terminal), just execute this to see all available commands:
y-ppa-cmd
launchpad-getkeys  # import all missing keys
ppa-purge              # remove a PPA repository source from your system

Convert existing PPA repositories to Natty

I'll offer you here some commands you might want to use to convert your existing PPA repositories to your upgraded distro.
When upgrading Ubuntu to a newer version, all your personal repositories will be disabled to prevent problems.
After the upgrade you'll have to enable them by hand, even worse, the ones you had disabled before upgrading still point to the repositories of the previous distro.
You might use some of these commands to make these changes automatically.
# Become super-user
sudo -i
# Enter repository list folder
cd /etc/apt/sources.list.d/
# Change maverick to natty for all maverick specific list files and store them as natty ones
for sl in *-maverick.list ; do echo ${sl/maverick/natty} ; sed 's/# \(.*\) maverick\(.*\)/\1 natty\2/' $sl > ${sl/maverick/natty} ; done
# Remove the "disabled ..." comment
for sl in *-natty.list ; do echo ${sl} ; sed -i.bak 's/ disabled on upgrade to natty$//' $sl ; done
# Check they are all fine
for sl in *-natty.list ; do echo ${sl/maverick/natty} ; cat $sl ; done
# Cleanup backup files and maverick list files (not needed any longer)
rm *-maverick* *.list.bak

Severe design flaw in Natty's Upgrade Process

Ubuntu's latest version 11.04 (Natty Narwhal) arrived a few days ago, some people hate it already before launched, high expectations by others.
Personally, I waited for that version several months already, hoping that it will resolve the slow problems I had on my personal laptop, as described on my previous post. Even changing the Kernel version, never solved the problem completely.
Here my update experience on three systems (all were 10.10).

Desktop PC

Machine gots stuck and hang during the upgrade process.
After rebooting, when trying the use the new Grub entry, it claims that my hardware doesn't support Unity.
After a second boot, entering the Previous Linux entry, my old 10.10 system started up perfectly and advised about a partial upgrade.
The upgrade continued smooth and left my system at the end with a running Natty.
Only my Chromium isn't usable any longer, but that's another story.

Dell home laptop

The 2nd, a smooth upgrade, without any problem.
First I downloaded the ISO image, and mounted the burned CD as software source, so most of the packages hadn't to be downloaded from the net.
After upgrade, the slow problem was gone, finally I have a fast system again, even compiz effects are usable again.
Great, all my expectations have been reached.

Lenovo office laptop

My last system hang too during the update process, it blocked with the screen-saver and I wasn't able to enter the desktop, so I couldn't see where exactly it got stuck.
Rebooting the system, first showed that Grub hadn't been updated yet, and even worse, my old system didn't booted up.
My root partition didn't mount correctly.
Inspecting with the SystemRescueCD (I have an entry to it's ISO in my Grub boot menu as explained in this post) revealed that the filesystem hadn't been damaged, all files where there.
After some investigation, I found this discussion about a serious design flaw in the Upgrade Process which could lead to that situation.
I could recover with the mentioned commands as seen below.

Recovering from not ready yet or not present root partition

mount -w -o remount /dev/sda1 /
dpkg --configure -a
Only one package made trouble, winbind, so I removed it with aptitude purge winbind, then run the dpkg command again and finally rebooted into a running Natty system.

Slow laptop with Ubuntu Maverick 10.10

Having installed Ubuntu Maverick on three systems, one desktop and two laptops, I really started to wonder, why during the past weeks my Dell laptop got slower and slower.
Opening two applications almost let the system being unusable.
Even worse, the frequency scaling of the CPU stopped working and was running at full speed all the time, heating the laptop, but going slow nevertheless.
First I thought it was a problem of the CPU scaling, so I installed cpufreqd, which at least slowed down the CPU a bit, very little.

Still wondering, ..., why?
I had installed my Dell laptop from zero, so I also thought it might have to do with the graphics driver, as compiz was impossible to use as well.

Then I started investigating a little further and I found several posts from users with the same symptoms, and everything pointed to a kernel 2.6.35 problems, the version that ships with Ubuntu 10.10

People said that upgrading to next kernel version solved that problem, so I tried that and it worked.
Now, I have a quicker system again.
Guess, I could have waited for Ubuntu 11.04, but if you have the same problem, and want to quick up your system, download a higher kernel version from here (2.6.36 rc7 for 32Bit, 2.6.36 rc8 for 64Bit systems).

Install instructions

wget -nc -q -P /tmp http://kernel.ubuntu.com/~kernel-ppa/mainline/v2.6.36-rc7-maverick/linux-{headers,image}-2.6.36-020636rc7{-generic,}_2.6.36-020636rc7.201010070908_{all,i386}.deb
sudo dpkg -i /tmp/linux-{headers,image}-2.6.36-020636rc7{-generic,}_2.6.36-020636rc7.201010070908_{all,i386}.deb
Software Update will offer you updates from kernel 2.6.35 which you might install without problem, as grub boot process will still find the newer 2.6.36 kernel and offers and boot that as the default one from the list anyway.

Nightly icon cache update for Gnome

Sometimes it happened on my Ubuntu system, that a newly added application didn't had its icon.
This can happen due to an not updated icon cache of GTK.
This can be fixed with the command
gtk-update-icon-cache
, which rebuilds the GTK+ icon cache.

So why don't do this automatically in the background on a daily basis (during the night)?

Install instructions

Just execute the following commands, which will put a script into /etc/cron.daily so that the cache is fixed and the missing icon appears overnight.
sudo -i
echo '#!/bin/sh
#
# 

for theme in $(find /usr/share/icons -mindepth 1 -maxdepth 1 -type d)
do 
    if [ -f "$theme/index.theme" ]
    then gtk-update-icon-cache -f -q "$theme"
    fi
done

exit 0' > /etc/cron.daily/update-icon-cache
chmod a+x /etc/cron.daily/update-icon-cache

SystemRescueCD from ISO image

The new grub loader shipped with Ubuntu Lucid is able to boot systems directly from ISO images located in any hard disc partition.

Lets use this fact and have always the latest SystemRescueCD at hand, without having to burn a new CD, just by having its ISO on our Ubuntu partition.

There are some instructions on their web-site, but
  1. they don't work

  2. why not use grub's update mechanism to include the SystemRescueCD entry automatically, instead of having to add it by hand.


Therefore, grub offers to have some scripts in /etc/grub.d which are called during the update process and I'll give you here the steps for adding the ISO image as entry "magically".

Install instructions


  1. Download latest SystemRescueCD image from their web.

  2. Move it somewhere inside the /boot folder, for example I use a subfolder:
    sudo mkdir /boot/sysrcd
    sudo mv systemrescuecd*.iso /boot/sysrcd/

  3. Create a new file /etc/grub.d/50_sysrcd and put the following content:
    #!/bin/sh

    # Search for System Rescue CD iso file in /boot and add it as boot-entry.

    for iso in $(find /boot -name systemrescuecd*.iso)
    do
    isofile=`echo $iso`
    version=`echo $iso | cut -d "-" -f 3 | cut -d "." -f 1,2,3`
    echo "Found SystemRescueCD image: ${iso}" >&2
    cat << EOF
    menuentry "SystemRescueCd ${version}" {
    loopback loop ${isofile}
    linux (loop)/isolinux/rescuecd isoloop=${isofile}
    initrd (loop)/isolinux/initram.igz
    }
    EOF
    done

  4. Make it executable:

  5. sudo chmod a+x /etc/grub.d/50_sysrcd

  6. Now, we are ready to update the grub menu:
    sudo update-grub


That's it, now when you reboot your system, you should see the SystemRescueCD as latest entry and you can just boot it up.

You could also have several versions of the ISO images in /boot/sysrcd and this will give several grub entries.

Nice if you need to tweak your system partitions, need to recover something from your broken Windows partition, you just have the tools there, and it only occupies about 250 MB on your Linux partition.
And whenever you want to use a newer version, just download the new one, replace the old ISO, and update the grub menu again.

Troubleshooting


If you get these messages during update-grub
Testing for an existing GRUB menu.lst file ... found: /boot/grub/menu.lst

and
Updating /boot/grub/menu.lst ... done

this means that you still using grub version 1, not the latest one.
In that case, you should first upgrade grub with
sudo aptitude install grub2

Remove Evolution

Personally, I prefer Thunderbird for mailing than the preinstalled Evolution.
If you share the same preference, surely you tried to remove Evolution from your system, just to run into a dead-end, because several packages depend on it, especially one meta package.
Evolution seems to be embedded into Ubuntu like IExplorer in Windows.

But yesterday I found some Spanish article explaining how to remove it from the system, leaving about 56 MB of free space on your system.
I just added two more packages to the de-installation instruction that where missing for my Ubuntu 9.10 system.

Deinstall instructions


sudo aptitude purge evolution-indicator evolution evolution-documentation-en evolution-common evolution-data-server evolution-webcal evolution-plugins evolution-couchdb evolution-exchange mail-notification-evolution

Setup GDM2 startup graphically


GDM2Setup is a graphical tool that allows us to setup the new GDM2 included since Ubuntu Karmic.

After installation, a new entrance in the menu appears: System > Administration > Login Screen (GDM2Setup)

See also my post about other graphical setup tools for the Ubuntu bootup process.

Install instructions


sudo add-apt-repository ppa:gdm2setup/gdm2setup
sudo apt-get update
sudo apt-get install python-gdm2setup

Tweaking Ubuntu

There exist applications that provide many useful desktop and system options that the default desktop environment doesn't provide or are hard to find inside the Gnome configuration.

The following applications complete very well and you should use both of them, as each one offers a different set of tweaking options.

Ubuntu-Tweak


Ubuntu Tweak is an application designed to adjust Ubuntu easier for everyone, handling package caches, tweaking nautilus, offering a bunch of application to install.

Install instructions


sudo add-apt-repository ppa:tualatrix/ppa
sudo apt-get update && sudo apt-get install ubuntu-tweak


Ailurus


Ailurus is a similar Ubuntu enhancement application. It can install/remove applications which do not provide Debian packages at all. It can change system settings. Moreover, it can detect which Ubuntu repository is the fastest one for your connection.

Install instructions


sudo add-apt-repository ppa:ailurus
sudo apt-get update && sudo apt-get install ailurus

Cleanup broken package

I tried to downgrade the flashplugin to the previous 9 release, but all .deb installer packages I found on the web fail, cause they try to download a non-existing file from Macromedia website.

The problem I run into was that my Ubuntu system thought that the flashplugin-nonfree package was installed on the system, but I always failed to remove it with aptitude, apt-get or synaptic, leaving the package marked as broken.

Couldn't reinstall, nor purge, nor install any other package, because my system always claimed about the flashplugin-nonfree package.

Errors like these appeared:
 Package is in a very bad inconsistent state - you should
 reinstall it before attempting a removal.
Finally, I found some instructions which are able to remove the package information completely from the system, leaving apt in a state, where the package isn't marked as installed nor broken.

Install instructions

sudo rm -rf /var/lib/dpkg/info/flashplugin-nonfree.*
sudo dpkg --remove --force-depends --force-remove-reinstreq flashplugin-nonfree

Just replace flashplugin-nonfree with any package name that gives you trouble.

Global problems with the package repository

Sometimes you might not be able to install any package and you receive strange errors, like this:
Could not initialize the package information
A unresolvable problem occurred while initializing the package information.
Please report this bug against the 'update-manager' package and include the following error message:
'E:Encountered a section with no Package: header, E:Problem
 with MergeList 
/var/lib/apt/lists/archive.ubuntu.com_ubuntu_dists_hardy-updates_multiverse_binary-i386_Packages,
 E:The package lists or status file could not be parsed or opened.'
Somehow, apt's internal package repository cache got corrupted, so with the following commands you can recreate it from scratch.
sudo rm /var/lib/apt/lists/* -vf
sudo apt-get update
Now, you should be able to install packages as usual.

Trying to install from an outdated repository

It might be even worse, your Ubuntu version is an old release and is not supported any longer.
In that case, it's repositories are moved to an archive server.
You get errors like:
Reading package lists... Done               
Building dependency tree       
Reading state information... Done    
E: Couldn't find package xyz

But your package is probably available at http://old-releases.ubuntu.com
 The reason for this is that it is now out of support and no longer receiving updates and security patches.
If you don't want to upgrade to a newer distribution but want to continue using your outdated release then edit /etc/apt/sources.list and change archive.ubuntu.com to old-releases.ubuntu.com
sudo sed -i -e 's/archive.ubuntu.com\|security.ubuntu.com/old-releases.ubuntu.com/g' /etc/apt/sources.list
sudo apt-get update

Pin down the oficial Firefox version in Ubuntu

Today, I'll write an article about a more complicated administration tool: APTs pinning.

What is pinning?


Pinning is used to prevent your Ubuntu system to upgrade a package to a higher version through its automatic update system.

Why do you want to prevent an update?


Well, maybe the newer version of an application isn't working the way you want to or is buggy and you prefer to use the older version.

In my example, this happened to me with Firefox. The version 3.5 that ships with the official Ubuntu repositories works perfect.
But as I enabled the Mozilla-Daily repository from Launchpad to install the better Thunderbird 3.0 (see my article about installing it), that same repository also holds a newer version from Firefox. So my system all the time tries to upgrade to the version from Launchpad, which works worse for me.

How could I prevent upgrading Firefox from that repository, but still be able to use and update my Thunderbird 3.0 package from that one?

Obtain list of priorities


After searching through several articles and forum post, finally I found the tool I needed to setup the pinning.
apt-cache policy
apt-cache policy firefox-3.5

Whereas the first command shows a list of all your enabled repositories and their priorities, the second one gives you information about a concrete package.

In my case it shows:
firefox-3.5:
Installed: 3.5.4+nobinonly-0ubuntu0.9.10.1
Candidate: 3.5.5+nobinonly-0ubuntu0.9.10.1
Version table:
3.5.6~hg20091129r26611+nobinonly-0ubuntu1~umd1~karmic 0
50 http://ppa.launchpad.net karmic/main Packages
3.5.5+nobinonly-0ubuntu0.9.10.1 0
500 http://archive.ubuntu.com karmic-updates/main Packages
500 http://archive.ubuntu.com karmic-security/main Packages
*** 3.5.4+nobinonly-0ubuntu0.9.10.1 0
100 /var/lib/dpkg/status
3.5.3+build1+nobinonly-0ubuntu6 0
500 http://archive.ubuntu.com karmic/main Packages

You can see the installed version is 3.5.4, there is a newer version 3.5.5 from the official Ubuntu repositories, and a newer version 3.5.6 from the Luanchpad repository.
Interesting to look at is the Candidate: line, which shows the version that will be installed next by the update mechanism. Normally, this would be 3.5.6, but in my case, I lowered the priority of the Launchpad repository to 50, which is lower than the default, so it is not selected any more.

You want to know how this is possible? Read on.

Use pinning to lower upgrade priorities


The trick lays inside the /etc/apt/preferences, use man apt_preferences to read more about it.
Just execute the following instruction:

sudo echo "Package: *
Pin: release o=LP-PPA-ubuntu-mozilla-daily
Pin-Priority: 50" > /etc/apt/preferences.d/Mozilla-Daily

## or if that doesn't work for you (tried it only on Karmic):
sudo echo "Package: *
Pin: release o=LP-PPA-ubuntu-mozilla-daily
Pin-Priority: 50" > /etc/apt/preferences

sudo apt-get update


How to obtain the correct values


Remember the apt-cache policy command? Searching its output, you find the information:
 500 http://ppa.launchpad.net karmic/main Packages
release v=9.10,o=LP-PPA-ubuntu-mozilla-daily,a=karmic,n=karmic,l=Ubuntu,c=main
origin ppa.launchpad.net

From the release line I just selected the o=LP-PPA-ubuntu-mozilla-daily, enough to clearly select which packages will be pinned.

After the apt-get update, you will not be troubled any longer by the firefox updates from that repository, but the thunderbird-3.0 updates will still show up, because it doesn't exist in the official repositories.

Troubleshooting


I run into some trouble and will share the solutions here as well.

Can't find the o=LP-PPA-ubuntu-mozilla-daily entry


This happened in one of my machines, so at the end I had to pin down the whole Launchpad repositories, not only the Mozilla-Daily one.
sudo echo "Package: *
Pin: origin ppa.launchpad.net
Pin-Priority: 50" > /etc/apt/preferences.d/Mozilla-Daily
sudo apt-get update


Firefox and/or xulrunner still update from Mozilla-Daily


That happens when some packages have been updated from the Mozilla-Daily repository before. You'll need to downgrade them to a version from the official repositories.
Here an example (find the correct version with the apt-cache policy command):
sudo aptitude install firefox-gnome-support=3.5.5+nobinonly-0ubuntu0.9.10.1

Speed-up Ubuntu Boot-up time

I found these really interesting instructions which can speed up Ubuntu's startup.

The updates include a new kernel and replaces sreadahead with superfast ureadahead. To install these updates, follow these simple steps:

Install instructions

  1. Open the "Software Sources" under System->Administration.
  2. Select the “Other Software” tab.
  3. Click the “Add…” button in the lower left-hand
  4. Type “ppa:ubuntu-boot” and hit the “Add Source”
  5. Allow the system to refresh the sources
  6. Run “Update Manager” under System->Administration
That’s it! It will install the new kernel and replace sreadahead with ureadahead. You’ll need to reboot twice to see the benefits. The first reboot allows ureadahead to profile your boot so it can do its magic.

See also corresponding project on Launchpad.

Screensaver for Ubuntu Karmic


Ubuntu Karmic by default has very few screensaver modules enabled.
If you're a fan of screensaver, then I recommend you the following extra packages with install you more the 300 new modules.

Install instructions


sudo aptitude -y install xscreensaver-data-extra xscreensaver-gl-extra rss-glx


By the way, the rss-glx package gives you the beautiful skyrocket screen saver.

Instrumentation tools for Ubuntu

If you are a developer, administrator or you just want to track down some malfunction of your system, then some of these tools can be very handy.

sysdig

sysdig is a open source, system-level exploration: capture system state and activity from a running Linux instance, then save, filter and analyze.
Think of it as strace + tcpdump + lsof + awesome sauce.

systemtap


SystemTap provides infrastructure to simplify the gathering of information about the running Linux system. This assists diagnosis of a performance or functional problem. SystemTap provides a simple command line interface and scripting language for writing instrumentation for a live running system.

htop


Htop is an ncursed-based process viewer similar to top, but it allows to scroll the list vertically and horizontally to see all processes and their full command lines.

ethtool


ethtool can be used to query and change settings such as speed, auto- negotiation and checksum offload on many network devices, especially Ethernet devices.

EtherApe


EtherApe displays network activity graphically. Active hosts are shown as circles of varying size, and traffic among them is shown as lines of varying width.

Bandwidth Monitor NG


Bandwidth Monitor NG is a small and simple console-based live bandwidth monitor.

dstat


Dstat allows you to view all of your network resources instantly, you can for example, compare disk usage in combination with interrupts from your IDE controller, or compare the network bandwidth numbers directly with the disk throughput.

hping


hping3 is a network tool able to send custom ICMP/UDP/TCP packets and to display target replies like ping does with ICMP replies.

nast


nast is a packet sniffer and lan analyzer and can sniff in normal mode or in promiscuous mode the packets on a network interface and log it. Filters can be applied and the sniffed data can be saved in a separated file.

Install instructions


sudo aptitude install systemtap htop ethtool etherape bwm-ng hping3 nast
curl -s https://s3.amazonaws.com/download.draios.com/stable/install-sysdig | sudo bash

Ubuntu Karmic 9.10

This weekend I reinstalled one of my laptops with the latest Ubuntu release.
I didn't upgrade, because this installation was still young, without lots of personal tweaks and I read somewhere that if you upgrade from 9.04 you will miss some things that aren't upgraded by default like
  • partition with ext4 filesystem
  • encription of your home directory
In this post I'll put my impressions.
  • Design: I like the new darker brown theme and the startup screen is so beautiful. Icons are much better designed as well.
  • Firefox is 3.5 now, and is really fast at startup. Faster than the 3.5pre I used for the last weeks.
  • Thunderbird 3.0 isn't included, only 2.x can be installed. That sucks!
  • Wine: You should install the beta release, programs run so much faster, especially the GUI painting speeds up.
  • A new harddisk tool is included, which gives easy access to Smart information (healthy state about your disk).
    But the partition editor isn't included by default, you'll have to install it by hand.
  • The new Ubuntu Software Center isn't that useful as I thought. Okay, it's better than the old Application Installer, but most of the software I still have to install from Synaptic as it can't be found in the other one.
  • The Ext4 file-system seems to be really fast, find and locate finish in a few seconds.

Thunderbird 3.0 and Lightning


Similar to my previous post about Firefox 3.5, you can also go and use Thunderbird 3.0 already.

Even if its codename is Shredder and some of your extensions will stop working, I highly recommend this beta version,
  • especially if you access IMAP mail accounts, because the access is so much faster now.
  • the automated account creator which guesses the servers ports and settings is also a great invention I haven't seen in any mail client so far.
But not everything is gold, as mentioned before, most of your extensions will not work yet (see below how to get Lightning work, the most important one). I also don't like so much the cosmetic change in the layout which puts information like tags, and command buttons above the message content. This eats up to much space, especially for small screens like laptops.

Install instructions


sudo -v

echo "deb http://ppa.launchpad.net/ubuntu-mozilla-daily/ppa/ubuntu jaunty main" > /tmp/MozillaDaily.list
sudo mv /tmp/MozillaDaily.list /etc/apt/sources.list.d
sudo apt-key adv --keyserver keyserver.ubuntu.com --recv-keys 247510BE
sudo apt-get update
sudo aptitude install thunderbird-3.0 thunderbird-3.0-gnome-support

# Create a new entry in gnomes alternatives system and set Thunderbird 3.0 to be the preferred choice.
sudo update-alternatives --verbose --install /usr/bin/thunderbird thunderbird /usr/bin/$(readlink /usr/bin/thunderbird) 60
sudo update-alternatives --verbose --install /usr/bin//usr/bin/thunderbird thunderbird /usr/bin/thunderbird-3.0 70
sudo update-alternatives --verbose --auto thunderbird
# See current configuration, should result in:
## thunderbird - status is auto.
## link currently points to /usr/bin/thunderbird-3.0
## /usr/bin/../lib/thunderbird/thunderbird - priority 60
## /usr/bin/thunderbird-3.0 - priority 70
## Current `best' version is /usr/bin/thunderbird-3.0.
sudo update-alternatives --verbose --display thunderbird
# If you get into any trouble and want to use your previous Thunderbird again, just change the selection with
## sudo update-alternatives --config thunderbird


Get Lightning working again


The latest oficial release of Lightning will not work with the Thunderbird 3.0 pre release, so you'll have to install the latest nightly build.
wget http://ftp.mozilla.org/pub/mozilla.org/calendar/lightning/nightly/latest-comm-1.9.1/linux-xpi/lightning.xpi
# If you want to connect to Google Calendar:
wget http://ftp.mozilla.org/pub/mozilla.org/calendar/lightning/nightly/latest-comm-1.9.1/linux-xpi/gdata-provider.xpi

As Thunderbird 3.0 pre gets updated, from time to time, Lightning could stop working again.
Just download again the latest nightly build and install it again.
To make things easier, someone created an extensions for updating to nightly builds.

Ubuntu 9.04 Jaunty - Disable Update Notifier


Previous versions of Ubuntu notified with a simple panel icon about new available updates.
With Ubuntu Jaunty this behaviour changed, and the update manager window is opened automatically.
In my opinion, this is very annoying, I prefer the panel icon advisor where I can launch the update manager whenever I want.

So I searched and found the corresponding setting in the systems Configuration Editor.

From the GUI


Open Gnome's Configuration Editor from Applications-->System Tools (maybe you'll have to install it first).
Enter the key /apps/update-notifier and uncheck the auto-launch flag as shown in the screenshot.

From a terminal


gconftool -s --type bool /apps/update-notifier/auto_launch false


Post note: After writing this post I found a thread from the Ubuntu forum discussing this problem.