Random screensaver with Linux Mint Cinnamon

If you like screensavers, probably you already installed the xscreensaver package, but in Cinnamon you don't have the option to select a random one. But we can let the crontab periodic jobs change the systems entry where the currently selected screensaver is set.

Install instructions

In a terminal launch the command
crontab -e
to edit your crontab definitions and add the following at the end of the file:
# Randomize screensaver
0 * * * * DISPLAY=:0 gsettings set org.cinnamon.desktop.screensaver xscreensaver-hack \'$(ls /usr/lib/xscreensaver | sort -R | head -n 1)\' 2>&1 | logger -t screensaver
This will change every hour the screensaver to one located in the xscreensaver package.

Use Nemo with All-in-one-Places Cinnamon applet

It's really a pity, that the All-in-one-places applet hasn't got an update for including support for Nemo, as this is IMHO the best one of its kind.
But there's a workaround.
Its enough to add Nemo to the available filemanagers in settings.py
I provide you here a patchfile that you can apply, so you don't have to edit the file by yourself.
Just execute the following steps in a command line terminal.

Install instructions

First you'll have to create the patchfile with this:
cat <<EOF  >/tmp/All-in-one-Place.patch
--- a/.local/share/cinnamon/applets/all-in-one-places@jofer/settings.py
+++ b/.local/share/cinnamon/applets/all-in-one-places@jofer/settings.py
@@ -28,7 +28,7 @@ PANEL_WIDGETS = [
     {'type': 'switch', 'args': { 'key': 'full-color-panel-icon', 'label': _("Show the panel icon in full color") }},
     {'type': 'switch', 'args': { 'key': 'show-panel-text', 'label': _("Show text in panel") }},
     {'type': 'entry', 'args': { 'key': 'panel-text', 'label': _("Panel text") }},
-    {'type': 'combo', 'args': { 'key': 'file-manager', 'label': _("File manager"), 'values': {'nautilus': 'Nautilus', 'thunar': 'Thunar', 'pcmanfm': 'PCManFM'} }},
+    {'type': 'combo', 'args': { 'key': 'file-manager', 'label': _("File manager"), 'values': {'nautilus': 'Nautilus', 'thunar': 'Thunar', 'pcmanfm': 'PCManFM', 'nemo': 'Nemo'} }},
     {'type': 'entry', 'args': { 'key': 'connect-command', 'label': _("Application for the  \"Connect to...\" item") }},
     {'type': 'entry', 'args': { 'key': 'search-command', 'label': _("Application for the \"Search\" item") }}
 ]
EOF
Apply the patch with this:
cd ~ ; patch -p1 < /tmp/All-in-one-Place.patch
No log out of the cinnamon session is necessary.
Just open now the settings of All-in-one-place and select Nemo from the filemanager combo.

Adorn a dumb terminal

 Sometimes, you need to sit in front of a servers terminal, one without any window manager.
So you lack the cut&paste function of your mouse.
And to make things worse, it's keyboard isn't your native one, so you start trying out certain characters like . / and so on.

An administration nightmare!

So here come some instructions to get rid of these burdens so you can focus on the real problems.

Set your favourite keyboard

Just load another keyboard translation table that fits your fingers needs:

loadkeys [keymap]

# Examples:
# loadkeys de   # german keymap
# loadkeys es   # spanish keymap
Available keymaps can be found mostly in /lib/kbd/keymaps.

Cut&paste mouse functionality

If your server has internet connection than go and install the gpm package, a cut and paste utility and mouse server for virtual consoles, which permits to use your mouse on the terminal, even if it's very basic it permits selection and pasting with middle button.
# Install the gpm package
yum install | apt-get install | etc.   gpm

# Launch the daemon
gpm -m /dev/input/mice -t exps2

Speed-up bash scripts that use grep often

The last day I ran into a very awkward situation, but lets start from the beginning:
I wrote a bash script that had to perform several regular expression grep's in several text files.
So far so good, but the script always needed several minutes since the first version. I never wondered about this long execution time, the script runs on a remote server and also uses some mysql searches on another server.
Until some days ago, I wanted to debug a minor error with bash -xv to see all instructions when being executed.
To read the huge output more easily, I logged into the remote server from emacs editor and launched the script and had all the output in my emacs window in a few seconds. Wait, it only needed a few seconds?!
What happened, I rechecked the execution, with exactly the same parameters to the script from my emacs shell and from a ssh terminal.
The same, within emacs it only took some seconds, within the ssh terminal y took minutes.

So what's going on here?
Investigating the processes in the remote server with htop showed that the grep commands consumed almost 100% of the CPU for some time.
But when launched from emacs they did not.
What might be different?
Well, what about the environment?
Emacs might use it's own set of environment, different from a terminal.
Looking at the export definitions of both, I could see that the locale was different, emacs was using the C, whereas the terminal was using the English en_UK.UTF8.
Issuing a export LC_ALL=C in the terminal and then launching the script ... only a few seconds.
So it seems, grep is sensible to the locale of the shell.
Investigating in the web confirmed this, people talk about a speed enhancement of up to 10 times when using the C locale with grep, as it doesn't have to convert anything, it just compares a plain ASCII set of character, which in most cases is enough.
Also, grep is slightly faster when comparing fixed strings if you use the -F flag or call it with fgrep (due to lazyness I always used grep in such cases).

Instructions for speeding up grep

At the beginning of my scripts, I now put these instructions, which will force to use the C locale for all three flavours of grep:
shopt -s expand_aliases
for g in "" e f; do
    alias ${g}grep="LC_ALL=C ${g}grep"  # speed-up grep commands by not considering locale.
done
It does not work to just put export LC_ALL=C at the beginning.

More fortunes for Mint

If you like to see some funny quotes when opening a new shell terminal, you can enable the fortune-mint script that will be launched automatically.
By default, this script only shows non-offensive quotes and only three different types of animals: the moose, the tux and the koala.
But the cowsay package provides a whole bunch of pictures that can be used.
Cow files in /usr/share/cowsay/cows:
apt beavis.zen bong bud-frogs bunny calvin cheese cock cower daemon default
dragon dragon-and-cow duck elephant elephant-in-snake eyes flaming-sheep
ghostbusters gnu head-in hellokitty kiss kitty koala kosh luke-koala
mech-and-cow meow milk moofasa moose mutilated pony pony-smaller ren sheep
skeleton snowman sodomized-sheep stegosaurus stimpy suse three-eyes turkey
turtle tux unipony unipony-smaller vader vader-koala www

The following patch will enable all these that you have installed in your system, as well as all different eye and tongue styles. If you don't like offensive quotes, you'll have to take off the -a parameter from the fortune command in the last line of the patch below.

Install instructions

Paste the following into a textfile, for example mint-fortune.patch
4c4
<     RANGE=3
---
>     declare -a cows=( $(cowsay -l | grep -v "Cow files in") )
6,17c6,7
<     let "number %= $RANGE"
<     case $number in
<         0)
<             cow="moose"
<             ;;
<         1)
<             cow="tux"
<             ;;
<         2)
<             cow="koala"
<             ;; 
<     esac
---
>     let "number %= ${#cows[*]}"
>     cow=${cows[$number]}
19c9
<     RANGE=2
---
>     declare -a says=( say think )
21,30c11,19
<     let "number %= $RANGE"
<     case $number in
<         0)
<             command="/usr/games/cowsay"
<             ;;
<         1)
<             command="/usr/games/cowthink"
<             ;;
<     esac
<     /usr/games/fortune | $command -f $cow
---
>     let "number %= ${#says[*]}"
>     command="/usr/games/cow${says[$number]}"
> 
>     declare -a states=( "" -b -d -g -p -s -t -w -y )
>     number=$RANDOM
>     let "number %= ${#states[*]}"
>     state=${states[$number]}
> 
>     /usr/games/fortune -a | $command $state -f $cow

Then apply this patch to the original script (a backup will be created) and enable the fortune-teller:
sudo patch -b /usr/bin/mint-fortune mint-fortune.patch
gconftool-2 --set /desktop/linuxmint/terminal/show_fortunes true --type bool

Provide your own cows

You can create your own cow files, just have a look at the manual of the cowsay command. Or just copy the ones I prepared from here into any folder you want.
You could just copy them into the system folder /usr/share/cowsay/cows, but if you want to keep them separated, you can instruct cowsay to look for you ones too (for example in your folder ~/Documents/cows:
mycows=~/Documents/cows ; sudo sed -i.orig 's|/usr/bin/mint-fortune|export COWPATH=/usr/share/cowsay/cows:'$mycows'\n\0|' /etc/bash.bashrc

Example of a Star Wars scene as cow

 _____________
< Hello world >
 -------------
          \
           \                .==.
            \              ()oo()-.
             \  .---.       ;--; /
              .'_:___". _..'.  __'.
              |__ --==|'-''' \'...;
              [  ]  :[|       |---\
              |__| I=[|     .'    '.
              / / ____|     :       '._
             |-/.____.'      | :       :
            /___\ /___\      '-'._----' 

SSH key handling

If you have to work with servers, especially with Linux ones, sooner or later you'll have a confrontation with SSH.

I'll give here some tips and tricks I used so far.

Force user and port for certain servers

When you try to login into a server, by default ssh uses your username and port 22 by default.
But maybe you need to use always another user name or another port.
You could specify this always as parameters for ssh:
ssh -p 22022 [notme@]server-ip

But it is much easier to configure your ssh client to these by default.
Therefore, you just add the following to your ~/.ssh/config file:
host server-ip another-server-name
Port 22022
User notme

host *
User root
You can put here as many hosts with different parameters as you want, '*' is also supported for creating regular expressions.

Change order of authentication methods

There's a another very useful parameter that you might want to add to your server configurations:
host *
User root
PreferredAuthentications publickey,password

This would only allow to use keys or passwords and prevents to use other methods which might not work in your setup and slow down connection attempts.
Put this whenever you notice that it take several seconds to log into a server.

Copy your own key to server

This used to be the first step I do, whenever I access a certain server several times.
So I don't have to give the password each time I access the server.
# Copy my machines public key to the server (will prompt for password):
ssh-copy-id [user@]server-ip

# Unfortunately, ssh-copy-id only works with SSH port 22, so if you have to specify another
# one, you might use this instruction:
ssh-add -L | ssh -p22022 [user@]server-ip "umask 077; test -d ~/.ssh || mkdir ~/.ssh ; cat >> ~/.ssh/authorized_keys"

# Verify the granted access (now without password prompt):
ssh [user@]server-ip
# or when copying
scp afile.txt server-ip:test/ 

Fix non-working ssh public keys

Sometimes, the sshd server doesn't accept a previous copied ssh-key (ssh-copy-id). In that case, make sure you have the following configuration in /etc/ssh/sshd_config
RSAAuthentication yes
PubkeyAuthentication yes
AuthorizedKeysFile .ssh/authorized_keys

# If it still doesn't work apply the correct permissions to folders and files:
# chmod go-w ~
# chmod 700 ~/.ssh
# chmod 600 ~/.ssh/authorized_keys

# If it still doesn't work, then disable the permissions checking:
StrictModes no
Restart the ssh daemon again after applying this new configuration.

Debugging and sorting out further problems

The permissions of files and folders is crucial. You can get debugging information from both the client and server. if you think you have set it up correctly, yet still get asked for the password, try starting the server with debugging output to the terminal. /usr/sbin/sshd -d
To connect and send information to the client terminal ssh -v ( or -vv) username@host's

Remove authorized keys

If you have hundreds of keys in your machines ~/.ssh/authorized_keys and you're to lasy to edit that by hand, these one-line shell commands maybe handy.
Just use sed to rip out anything which doesn’t match the regex pattern (for example machine names, part of the hash, whatever:
# rip out anything which doesn’t match the regex pattern
sed ‘/your host name/ ! D’ -i.old ~/.ssh/authorized_keys

# or something more complicated
sed ‘/\(host1\|host2\)/ ! D’ -i.old ~/.ssh/authorized_keys

# with many patterns it is easier with this command
cp ~/.ssh/authorized_keys{,.old} && for p in pat1 pat2 pat2 ; do sed '/$pat1/ ! D' ~/.ssh/authorized_keys ; done

Just the ones specified will be maintained, a backup file will be created.
If you want to do the opposite, remove some specific keys and let the rest untouched:
sed ‘/\(host1\|host2\)/ D’ -i.old ~/.ssh/authorized_keys

Music Player Clementine

A few days ago, I discovered another music player which I'm using now daily: Clementine.

Features I like:
  • It's quick and stable.
  • Mood graphics of songs.
  • Dynamic random playlists.
  • Discover song information, covers and lyrics from variety of sites.
  • Cover manager to retrieve from even more sources.
  • Extensive artist information gathered from various sources.
  • Tons of visualization algorithms, random changes.
  • It integrates well with Cinnamons sound gadget.
Unfortunalty, the handling of external devices isn't perfect yet.
At least, I was not able to add songs from my external harddisks to the random playlist, I had to create a new playlist for that purpose.

Install instructions

Use Y-PPA-Manager and search for clementine package to obtain list of repositories or use the following shell commands:

sudo apt-add-repository ppa:me-davidsansome/clementine
sudo apt-get update
sudo apt-get install clementine

# You need to install the developer version for version 1.1, which features mood bars)
sudo apt-add-repository ppa:me-davidsansome/clementine-dev

Change LibreOffice progress bar color

Newest LibreOffice splash screen shows a orange-redish colour bar instead of a green one like it was some versions ago. I guess they changed it to integrate better with Unity default colours. But I'm using Linux Mint, so I liked the green one more. The other day, I just stumbled about the /etc/libreoffice/sofficerc configuration file, which defines some variables for the startup and there it is, the ProgressBarColor parameter.

Install instructions

The following instructions change the color from the shell command line, but you could also just edit the file with your favourite text editor (with root permissions).
# Put the color value into a variable
pbcolor=160,195,124

sudo sed -r -i.bak "s/(ProgressBarColor=)[0-9]{1,3},[0-9]{1,3},[0-9]{1,3}/\1${pbcolor}/" /etc/libreoffice/sofficerc

# Check that everything went fine (otherwise you can restore the backup file).
cat /etc/libreoffice/sofficerc
You can find the right colors for example with the Gimp image editor.

Mint Update Manager does not show Changelogs

If you are using Linux Mint, you might have noticed that the latest versions ship with an Update Manager that is able only to show you Changelogs of the packages from the Mint repositories and often they are cut off.

After searching through bug reports and forums finally I prepared a change of the underlying Python code which resolves the issue.

I hope they will integrate similar changes in the next version.

For more details you can have a look at these bug reports, where I got ideas and copied parts:

Install instructions

You can download the needed difference file from here, or just copy and paste the following into a file named mintUpdate.py.diff:
87c87,91
<                 changelog = source
---
>                 changes = source.split("\n")
>                 for change in changes:
>                     change = change.strip()
>                     if change.startswith("*"):
>                         changelog = changelog + change + "\n"
93c97,101
<                     changelog = source
---
>                     changes = source.split("\n")
>                     for change in changes:
>                         change = change.strip()
>                         if change.startswith("*"):
>                             changelog = changelog + change + "\n"
98,102c106,111
<                 source = commands.getstatusoutput("apt-get changelog " + self.source_package) 
<                 if source[0] != 0 or source[1].startswith("Err Changelog of"):
<                     changelog = _("No changelog available") + "\n" + _("Click on Edit->Software Sources and tick the 'Source code' option to enable access to the changelogs")
<                 else:
<                     changelog = source[1]
---
>                 source = commands.getoutput("aptitude changelog " + self.source_package)                    
>                 changes = source.split("urgency=")[1].split("\n")
>                 for change in changes:
>                     change = change.strip()
>                     if change.startswith("*"):
>                         changelog = changelog + change + "\n"
Then you can apply the patch with this command, it will leave a copy of the original script:
sudo patch -lb /usr/lib/linuxmint/mintUpdate/mintUpdate.py mintUpdate.py.diff
It has been created and checked with version 4.3.8.

Install LibreOffice 3.5

The current version of LibreOffice which ships with Ubuntu Oneiric is 3.4.4.
Lately, I was getting very angry about this version, because it gave me constant trouble:
  • it looses somehow control about its lock-files, therefore I wasn't able to save my open files any longer, neither with the old nor with a new name
  • graphics in calc files suddenly jumped to another sheet when opening the files
I loved LibreOffice so far, but this behaviour really pi.... me of.
So the other day, I read about the new release 3.5, its new features and so I decided to update it by hand.

Below, you can find the update script that I programmed for that task.

After using it for some time, here I list the most interesting stuff about the new version.
  1. No problem with the lock-files any longer.
  2. Graphics stay in their sheets.
  3. Conditional formatting now lets you define more then three conditions, this was really necessary, I use that feature a lot. I'm just missing an easy way for reordering.
  4. Bigger text box for writing formulas.
  5. The import of Microsoft Visio files.
  6. The print preview of all pages.
  7. and lots more

Install instructions

Just save the following lines as InstallLibreOffice.sh and execute it with the -h parameter to see the usage text. You can also download it from here directly.
#! /bin/bash

#
## LibreOffice installation from Debian Packages from website
## @author Sven Rieke
# 

language=en-US
version="3.5.0"

function Usage() {
    cat <<EOF
Usage: ${0##*/} [-h] [-v] [-l lang-id] [p lang-id] [-d version-id] [-u]

  Options:
    -h             Show this help.
    -v             Be verbose about processing steps.
    -l lang-id     Set language for main installer and documentation (default = ${language})
    -p lang-id     Set language for interface translation (not installed by default)
    -d version-id  Specify another package version (default = ${version})
    -u             Start with a clean user-profile
 
EOF
}

function AndOut() {
    popd
    exit
}

trap AndOut ERR

########################################################################
# Interpretation and validation of command line parameters and options #
########################################################################

while getopts :hvl:d:u OPT; do
    case $OPT in
 h|+h) Usage ; exit 0     ;;
 v|+v) VERBOSE=true       ;;
 l|+l) language="$OPTARG" ;;
 p|+p) langpack="$OPTARG" ;;
 d|+d) version="$OPTARG"  ;;
 u|+u) NEWUSER=true       ;;
 *)    Usage
       exit 2
    esac
done

sudo -v

mkdir -p /tmp/LibO.3.5
pushd /tmp/LibO.3.5

#### Download from http://www.libreoffice.org/download/?type=deb-x86
[[ -v VERBOSE ]] && echo "---[ Installing LibreOffice ${version}-${language} ]" >&2
[[ -v VERBOSE ]] && echo "*** Downloading packages ***" >&2

for i in install helppack ; do
    package="LibO_3.5.0_Linux_x86_${i}-deb_${language}.tar.gz"

    if [ ! -f $package ]; then
 [[ -v VERBOSE ]] && echo "*** Downloading new package $package ***" >&2
 wget http://download.documentfoundation.org/libreoffice/stable/${version}/deb/x86/$package
    fi
done

if [ -v langpack ]; then
    package="LibO_3.5.0_Linux_x86_langpack-deb_${language}.tar.gz"
    if [ ! -f $package ]; then
 [[ -v VERBOSE ]] && echo "*** Downloading new package $package ***" >&2
 wget http://download.documentfoundation.org/libreoffice/stable/${version}/deb/x86/$package
    fi
fi

[[ -v VERBOSE ]] && echo "*** Decompressing downloaded archives ***" >&2
for t in LibO_3.5.0_*.tar.gz ; do tar xzf $t ; done

[[ -v VERBOSE ]] && echo "*** Removing old LibreOffice installation ***" >&2
sudo apt-get remove libreoffice-core

for d in $(find -maxdepth 1 -mindepth 1 -type d) ; do
    [[ -v VERBOSE ]] && echo "*** Install packages from $d ***" >&2    
    pushd $d/DEBS
    sudo dpkg -i *.deb

    if [ -d desktop-integration ]; then
 [[ -v VERBOSE ]] && echo "*** Install desktop integration ***" >&2
        cd desktop-integration
        sudo dpkg -i *.deb
        cd ..
    fi
    
    popd
done

if [ -v NEWUSER ]; then
    [[ -v VERBOSE ]] && echo "*** Remove old user profile ***" >&2
    mv ~/.config/libreoffice/3/user ~/.config/libreoffice/3/user_old
    [[ -v VERBOSE ]] && echo "*** Old one can be found in ~/.config/libreoffice/3/user_old ***" >&2
fi

AndOut

From repository

There also exists a repository which gets updated from time to time with the latest versions.
sudo add-apt-repository ppa:libreoffice/ppa
sudo apt-get update
sudo apt-get upgrade

Troubleshooting

In two installations I had trouble with my old user profile. LibreOffice claimed about templates already installed. Therefore, I added the -u switch to my install script which moves the whole user profile to a backup location, so LibreOffice will start with a new profile. Just copy your old templates to the new profile and reapply all your settings again.

Customize boot and startup

Change screen resolution, colors and background image.
Some time ago, I recommended and used StartUp-Manager for tweaking the Grub boot loader and system loader, but this project isn't updated any longer. I found some very valid replacements which work even better.

Grub Customizer


With Grub Customizer you can tweak the new GRUB 2 boot screens, select the default boot entry, change the menu visibility and timeout, set kernel parameters, disable recovery entries.

Install instructions

sudo add-apt-repository ppa:danielrichter2007/grub-customizer
sudo apt-get update
sudo apt-get install grub-customizer

Plymouth Manager

With Plymouth Manager you can change the startup animation, for example, put one which fits with your brand new Linux Mint.
sudo apt-add-repository ppa:mefrio-g/plymouthmanager
sudo apt-get update
sudo apt-get install plymouth-manager

Cinnamon Desktop

Cinnamon is a fork of the GNOME Shell, created by developers of the Linux Mint project.
It recovers the visual aspects of the old GNOME 2 desktops, but is more up-to-day, includes it's own visual effects and contains some details of GNOME 3.

Install instructions

If you are using Linux Mint, you can install Cinnamon directly from their repositories, but if you want to use the latest build and/or you want to install it in another system, use the following PPA repository.
sudo add-apt-repository ppa:merlwiz79/cinnamon-ppa
sudo apt-get update
sudo apt-get install cinnamon

# Install the weather extension
sudo apt-get install cinnamon-extension-weather

# Install some additional themes
sudo apt-get install git-core
cd /tmp && git clone https://github.com/linuxmint/cinnamon-themes.git
cd cinnamon-themes
./test

Troubleshooting

Not every software is perfect, and sometimes it could happen that your desktop manager gets frozen, for example a window gets paint and stays in the same place even if it's already closed.
There're several options to recover full control again:
  1. Use the Troubleshoot menu from the applet Better Cinnamon Settings which offers an entry Restart Cinnamon.
  2. Use Alt-F2 key combination to open Cinnamons internal command terminal and type 'r' followed by return.
  3. If you can't access the above two options (rare cases) you might want to restart Cinnamon from a terminal.
    • At this point, you might not even be able to open a terminal from the desktop, so you'll have to enter a system one with Ctrl-Alt-F1.
    • Make sure you know the display used by Cinnamon (normally it's 0, but you can verify it with 'w' command and the data in the FROM column:
      me~ $ w
       17:43:09 up 20:41,  6 users,  load average: 0.24, 0.23, 0.18
      USER   TTY      FROM             LOGIN@   IDLE   JCPU  PCPU   WHAT
      me     pts/0    :0.0             15:37    2:04m  0.24s 23.88s gnome-terminal
    • Export this value into the DISPLAY variable.
      export DISPLAY=:0.0
    • Finally, restart Cinnamon:
      cinnamon --replace
    • When you switch back to the desktop with Ctrl-Alt-F7 you should see an operative desktop after a while.
  4. The last option, if everything else fails, might be that it's not Cinnamon, but the underlying X system which is wrong, and you can reset this with Ctrl-Alt-Backspace.
    But this way, you'll have to login again into your session, which means, all open programs got closed.

Managing printers from CUPS web interface

Installed printers are listed here.
Recently, I had problems with my printer settings, I wanted to change the duplex setting and wanted to install a new network printer, but without success.
The problem I have is that in Linux Mint the Printers configuration applet fails, crashes and doesn't offer all options.

But finally I found a way. Linux Mint, like other distributions use the CUPS as printing system and it offers a web based administration interface.

Just point your web browser to http://localhost:631/. There you can add and manipulate all kind of printers and manage the print queues as well.

This is a nice workaround, until these options will be supported in the printer settings applet.

Sweet Home 3D : Prevent crashes and change icon

Sweet Home 3D is the best interior design application that I have found so far for Linux. It is easy to place your furniture on a house 2D plan, and render the whole scene in 3D.
The website gives you the possibility to run the application online without installation, as being written in Java.
Unfortunately there are two points that bothered me for a while and that I fixed finally:
  1. The application crashes every time you choose the preferences or the 3D rendering from the menu.
  2. The application icon has a very low resolution and looks awful when rendered by the application launchers.

Install instructions

Sweet Home 3D can be installed from the GetDeb application repository, execute the following in the shell:
sudo -v
# Enable GetDeb Application repository:
sudo echo "deb http://archive.getdeb.net/ubuntu oneiric-getdeb apps #GetDeb repository extends the official repositories" > /etc/apt/sources.list.d/GetDeb-Apps-oneiric.list
# Add the repository GPG key
wget -q -O- http://archive.getdeb.net/getdeb-archive.key | sudo apt-key add -
# Update package information
sudo apt-get update

# Install Sweet Home 3D package
sudo apt-get install sweethome3d

Prevent crashes

Sweet Home 3D checks whether computing off-screen 3D images is supported by Java 3D on your computer, but the detection test itself makes Sweet Home 3D crash!

A special flag can be passed to the Java command line inside the launcher script.
The following shell commands change the original script, and leave a backup.

sudo -v
sed -i.bak 's/java /java -Dcom.eteks.sweethome3d.j3d.checkOffScreenSupport=false /' /usr/bin/sweethome3d

Change icon to higher resolution

Higher resolution icons can be found inside the source code, the following shell commands replaces the low resolution one with a higher one:
sudo -v
cd /tmp
wget -q http://sweethome3d.cvs.sourceforge.net/viewvc/*checkout*/sweethome3d/SweetHome3D/src/com/eteks/sweethome3d/viewcontroller/resources/help/images/sweethome3d.png
sudo cp /tmp/sweethome3d.png /usr/share/pixmaps/sweethome3d.png

Application launcher Kupfer

For some time I used Gnome-Do as application launcher, for its beautiful design and huge amount of plugins which enhance its features. But there were to things which bothered me lately:
  • Gnome-Do's Skype plug-in stopped worked time ago
  • Some applications that I removed already, still showed up in the search results
  • Icons weren't refreshed.
All recommended tips that I found in forums (remove certain folders from Gnome-Do) didn't help.
But in one of these threads they commented about another application: Kupfer.
Tried that one, and it works like a charm, connection to Skype works, almost has all plugins that I used from Gnome-Do and seems to integrate with Gnome, KDE and other systems.

Install instructions

Kupfer can be installed right away from the universal repository:
sudo apt-get install kupfer 
In it's preferences you could choose the same key-combination you used with Gnome-Do, and set it's auto-start flag.

Changing wallpapers with Wally

Years ago, I posted about tools for changing your desktop wallpaper automatically.
The best tool I found so far is Wally, which is able not only to rotate through your local wallpaper picture collection, but also obtain them from several online storages like Picasa, Flickr, remote folders, etc.
It permits to define tags to include certain sets of pictures that you like.

Install instructions

Wally can be found in the universe repository of your Ubuntu system.
sudo apt-get install wally

KUbuntu

Wally is available as desktop plugin, so you'll have to enable it in your desktop folder settings.

Ubuntu Oneiric

Ubuntu recently changed the management of the desktop wallpaper, which breaks Wally 2.3.2 (the one which can be found in the repository), it isn't able to replace the wallpaper. To repair this, you'll have to install the .deb package 2.4.3 from the developers website.

Update to Ubuntu 11.10 Oneiric Ocelot

These days, Ubuntu's new release hit the repositories, so I upgraded my three systems as soon as possible to see if some annoying Unity bugs have been solved finally. Here is the resume and the reasons why I'll evaluate to switch to KDE finally: Upgrade
During the upgrades I had two issues:
  1. Emacs got somehow broken on one system y prevented the upgrade process to finish completely. It even said, the process had been aborted, but the only thing missing was the last Cleanup step.
    I removed emacs packages and reinstalled them, then everything went fine.
  2. Screenblanker got stuck on one of my machines during upgrade, so I could hit on any button to enter the last Cleanup step.
    I connected via Remote Desktop to that machine and could finish the process correctly.
Updating custom repositories
As usual, the upgrade process disables all your custom repositories to prevent problems. You'll have to adapt and enabled them by hand, or you might use these instructions to do this with a few commands.
# Become super-user
sudo -i

# Set some variables (these can be changed to adapt to other Ubuntu versions)
export old=natty
export new=oneiric

# Enter repository list folder
cd /etc/apt/sources.list.d/

# Change old distribution list files and store them as newer ones
for sl in *-${old}.list ; do echo "Creating ${sl/${old}/${new}}" ; sed 's/\(.*\) '${old}'\(.*\)/\1 '${new}'\2/' $sl > ${sl/${old}/${new}} ; done

# Enable and remove the "disabled ..." comment
for sl in *-${new}.list ; do echo "Enabling ${sl}..." ; sed -i.bak 's/^# \(.*\) disabled on upgrade to '${new}'$/\1/' $sl ; done

# Check they are all fine
for sl in *-${new}.list ; do echo "Content of ${sl/${old}/${new}}:" ; cat $sl ; done

# Cleanup backup files and old distribution list files (not needed any longer)
rm *-${old}* *${new}.list.bak

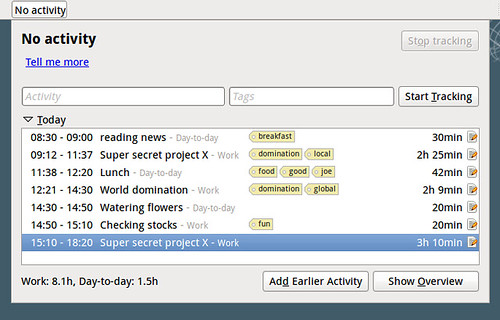
Time tracking with Hamster indicator

At work, I find it very handy to track the time I'm spending on some tasks. Especially, if you have to report to someone the time you spend on certain projects or whatever.
Hamster is such a time tracker that I found to be very useful, easy to use, and enables you to obtain statistics about your daily/weekly/yearly work.

It gives you the possibility to introduce information from the shell, but there's also a graphical indicator available, which fits perfectly with Ubuntu Gnome and Unity.

Install instructions

If you need more details about the following installation and configuration commands, you can consult this article.
# Add repository
sudo add-apt-repository ppa:albertomilone/hamster-indicator

# Add description to repository for easier identification
sudo sed -i.save 's/$/ #Hamster-Indicator Time-Tracker/' /etc/apt/sources.list.d/albertomilone-hamster-indicator-natty.list

# Install Hamster Indicator
sudo apt-get update
sudo apt-get install hamster-indicator

Configuration

The hamster indicator permits to change how and which information to show on the Unity panel.
# Show all possible configuration values and values
gconftool-2 -R "/apps/hamster-indicator"

# Toggle Icon Glow
gconftool-2 --toggle "/apps/hamster-indicator/icon_glow"

# Toggle Show Label
gconftool-2 --toggle "/apps/hamster-indicator/show_label"

# Set enough space for label
gconftool-2 --set "/apps/hamster-indicator/label_length" --type int "20"

Database location

It might be interesting to now, where Hamster stores it's data, for example for backups, or if you want to copy/share the data to another Ubuntu installation.
~/.local/share/hamster-applet/hamster.db

Obtain some basic hardware details of your Ubuntu system

Unix systems are capable of recognizing lots of details of your hardware, so instead of having to open your PC for obtaining information like serial numbers, just use some shell commands.
Here is a list of such useful commands.

General system

grep -r . /sys/class/dmi/id/ 2>/dev/null
lsusb
lspcmcia
lspci -vvnn
udevadm info --export-db
lshal
sudo lshw

BIOS

sudo vpddecode    # Serials from BIOS, Motherboard
sudo biosdecode   # More details about BIOS
sudo dmidecode -q # Show information about valid BIOS components
sudo dmidecode    # Show also unknown/invalid BIOS components

CPU

lscpu
cat /proc/cpuinfo

Audio

cat /proc/asound/card*/codec#*

Drivers

lsmod

Upgrade to Picasa 3.8 on Ubuntu


If you're still stick to old 3.0 version of Picasa on your Ubuntu system (because you prefer it over Ubuntu's own programs, as I do), here are some instructions about how to upgrade Picasa to newer versions which have for example Face Recognition.

Install instructions

These instructions have been tested on Ubuntu Natty, and for Picasa 3.8, in case there's a newer version released you'll have to change it's location (search below for HERE).
## Add Google's testing repository for Picasa
sudo echo "deb http://dl.google.com/linux/deb/ testing non-free #Google Picasa" > /etc/apt/sources.list.d/google-unstable.list
sudo apt-key adv --keyserver keyserver.ubuntu.com --recv-keys 7FAC5991
sudo apt-get update
## Install Picasa 3.0
sudo apt-get install picasa

## Download Picasa 3.8 installer
# If there's a newer version you might to have to change it's name and location HERE
cd /tmp && wget http://dl.google.com/picasa/picasa38-setup.exe

## Install it (will not override your current Linux Picasa 3.0)
# Use default settings
wine /tmp/picasa38-setup.exe

## Copy over Picasa 3.8 files to your Linux Picasa 3.0 installation with backup
sudo cp -r /opt/google/picasa/3.0/wine/drive_c/Program\ Files/Google/Picasa3{,_3.0}
sudo cp -r ~/.wine/drive_c/Program\ Files/Google/Picasa3/* /opt/google/picasa/3.0/wine/drive_c/Program\ Files/Google/Picasa3/

## Uninstall the previous installed Picasa 3.8 (it's not needed any longer)
wine ~/.wine/drive_c/Program\ Files/Google/Picasa3/Uninstall.exe
Now you can run Picasa as usual from Applications --> Graphics --> Picasa --> Picasa
In case that something went wrong, you can find a backup of Picasa 3.0 in /opt/google/picasa/3.0/wine/drive_c/Program\ Files/Google/Picasa3_3.0